Article Directory
A bit of a backstory on this vehicle: I bought this car in June of 2022. The engine in it had rod knock. I wanted to go with a different option than the EJ25D that was in it, hence the search began. The car has been sitting for a year and a half now. Below is a list of items that I worked through to get this swap to work:
| Item To Complete | Time to Complete | Level of Completeness |
|---|---|---|
| New Plugs and Wires | 30 minutes | Complete |
| Longblock Cleaning | 2 hours | Complete |
| New Exhaust Manifold Studs | 30 minutes | Complete |
| Flex Plate to Crank | 30 minutes | Complete |
| Intake Manifold Removal | 45 minutes | Complete |
| Engine Secured in Car | 4 hours | Complete |
| Lower Bellhousing Studs | 4 hours | Complete |
| Intake Manifold Reintstallation | 1 hour | Complete |
| Flex Plate Bolts | 15 minutes | Complete |
| Power Steering Pump | 20 minutes | Complete |
| Alternator | 30 minutes | Complete |
| Drive Belt | 30 minutes | Complete |
| Custom Radiator Mounts | 2 hours | Complete |
| Radiator and Fan Installation | 1 hour | Complete |
| Starter Installation and Ground Point Fabrication | 2 hours | Complete |
| Knock Sensor Swap (cracked piezo) | 20 minutes | Complete |
| Fuel Line Management | 25 minutes | Complete |
| Air Filtration System | 1 hour | Complete |
| Install Exhaust Manifold | 30 minutes | Complete |
| Vacuum/Evap System Routing | 2+ hours (I have no idea what goes where) | Complete |
| Oil, Transimission Fluid, Coolant, Gasoline | 1 hour | Complete |
| Interior Tasks: Glovebox, Seat mounting, Steering column covers, Diff-Lock wiring | 3+ hours | Complete |
| Battery Installation | 5 minutes | Complete |
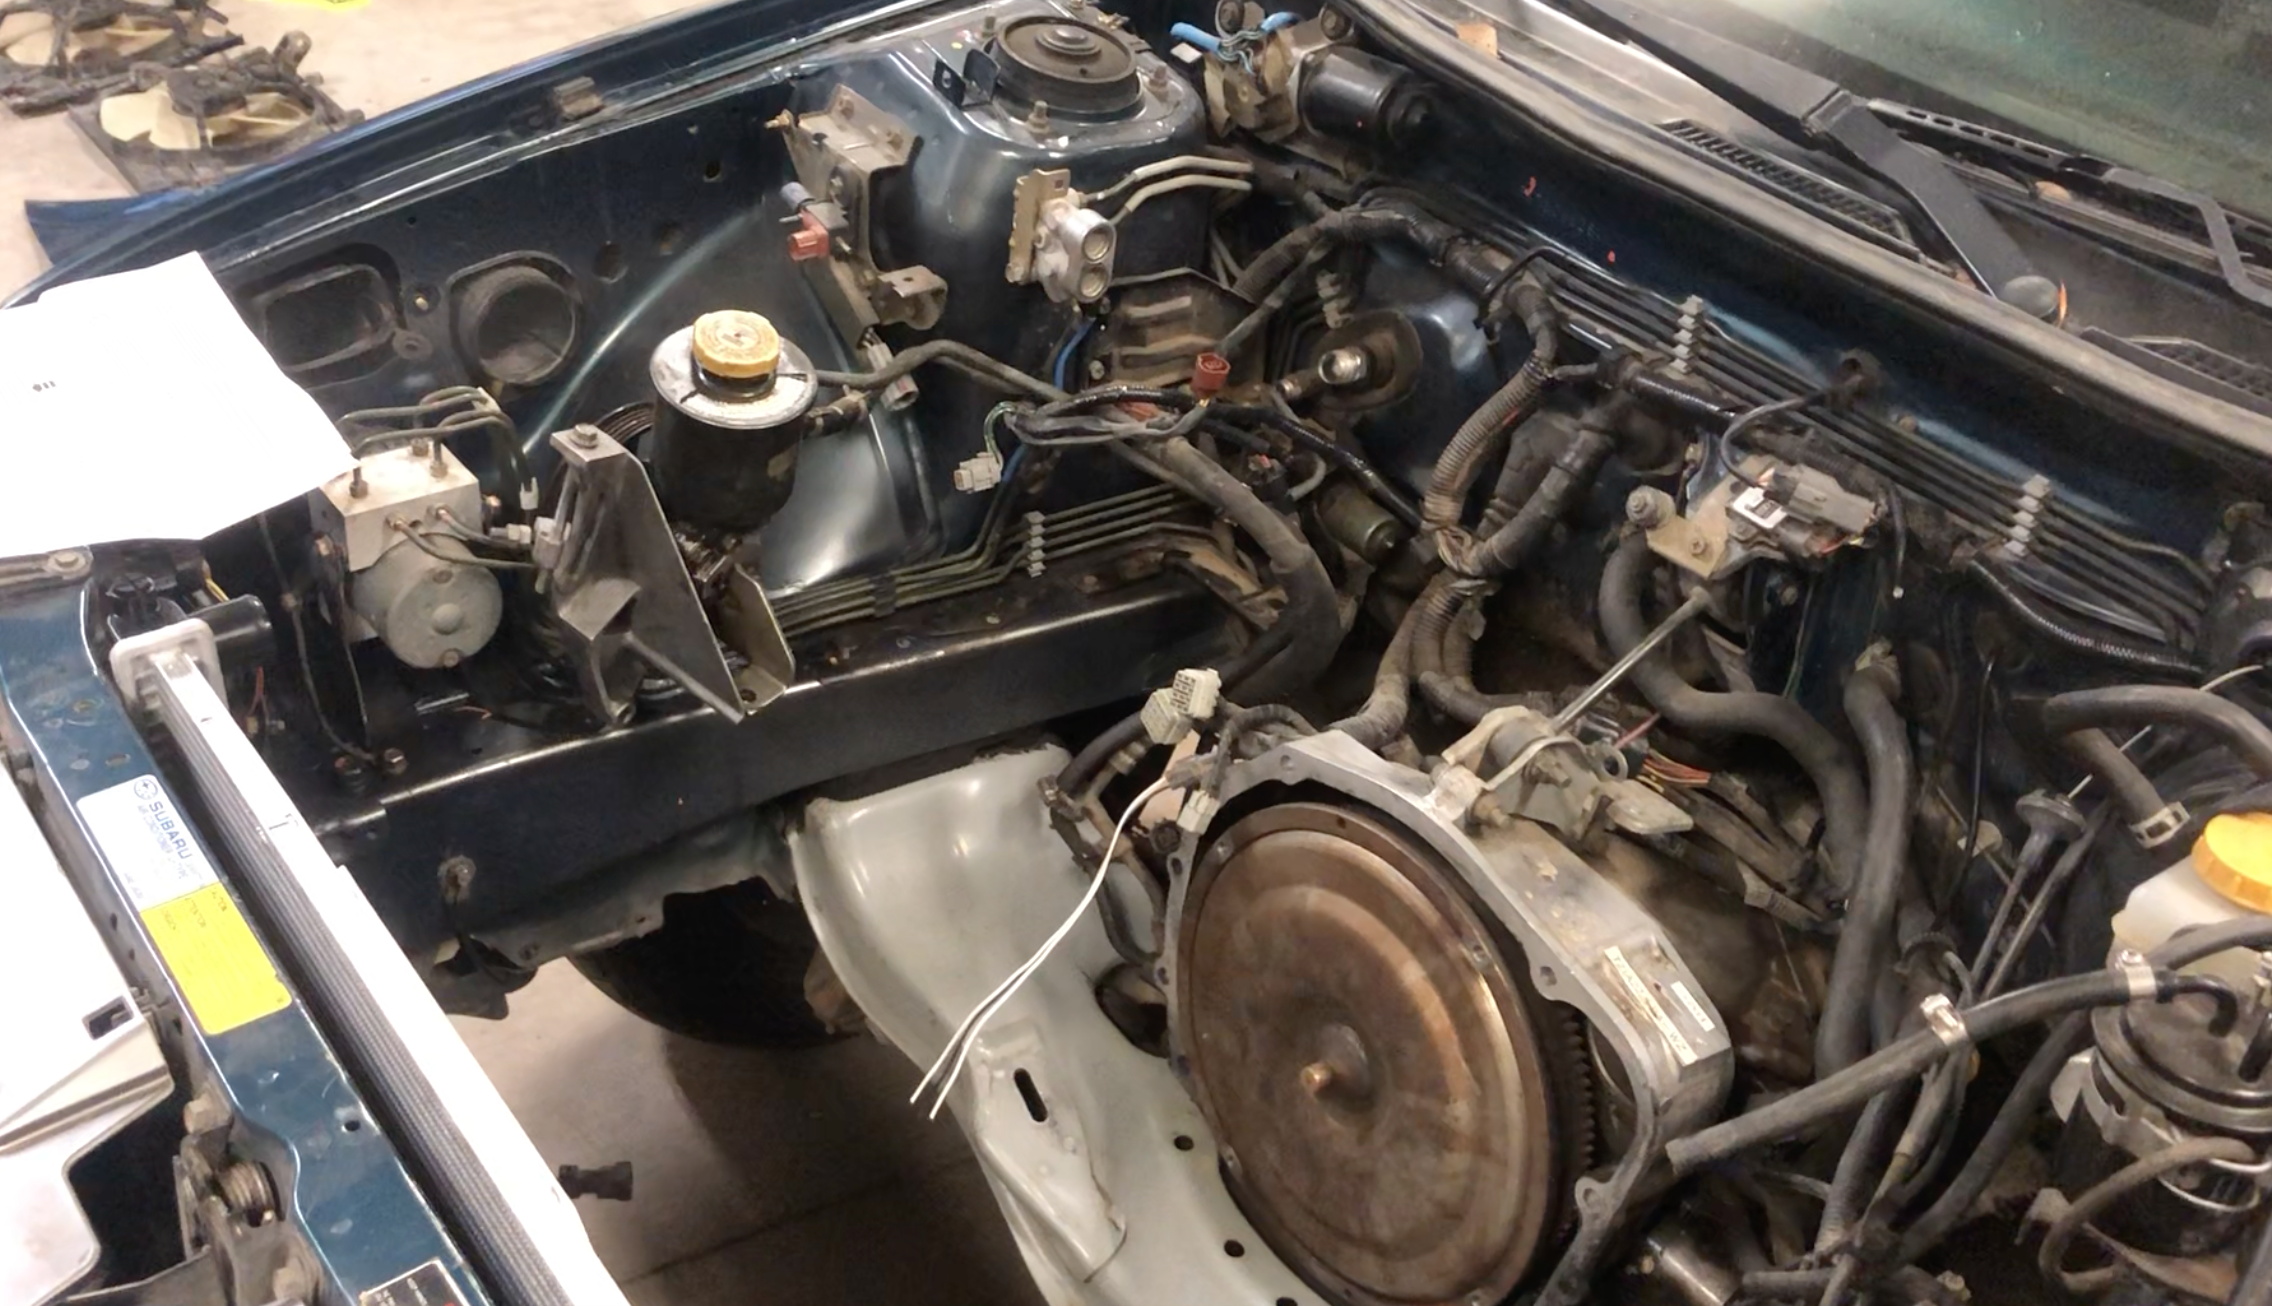
Engine bay before starting work, went through and cleaned it with a fellow subaru owner over the summer.
So, this is actually a nice straight forward swap (unlike a lot of swaps out there). There are basically no wiring hurdles that need to be overcome to get this to work. That is if you get the right engine, and accompanying parts.
Introduction
Got the engine. It has an unknown number of miles, at least that is what the scrap yard I got it from said. So that is definitely a little worrisome. This particular engine does have new cylinder heads though. These heads have hydraulic lifters, instead of solid style lifters. Compression is apparently around 160psi per cylinder; turning the engine over by hand it certainly feels that way. The engine was coated in a thick, nearly immpenetrable layer of oil and dust. It didn't really help that I was used a primitive way of removing it; dabs of degreaser, plenty of rags, and the occassional sweet, sweet sip of la-croix. Below is a picture of the beauty:
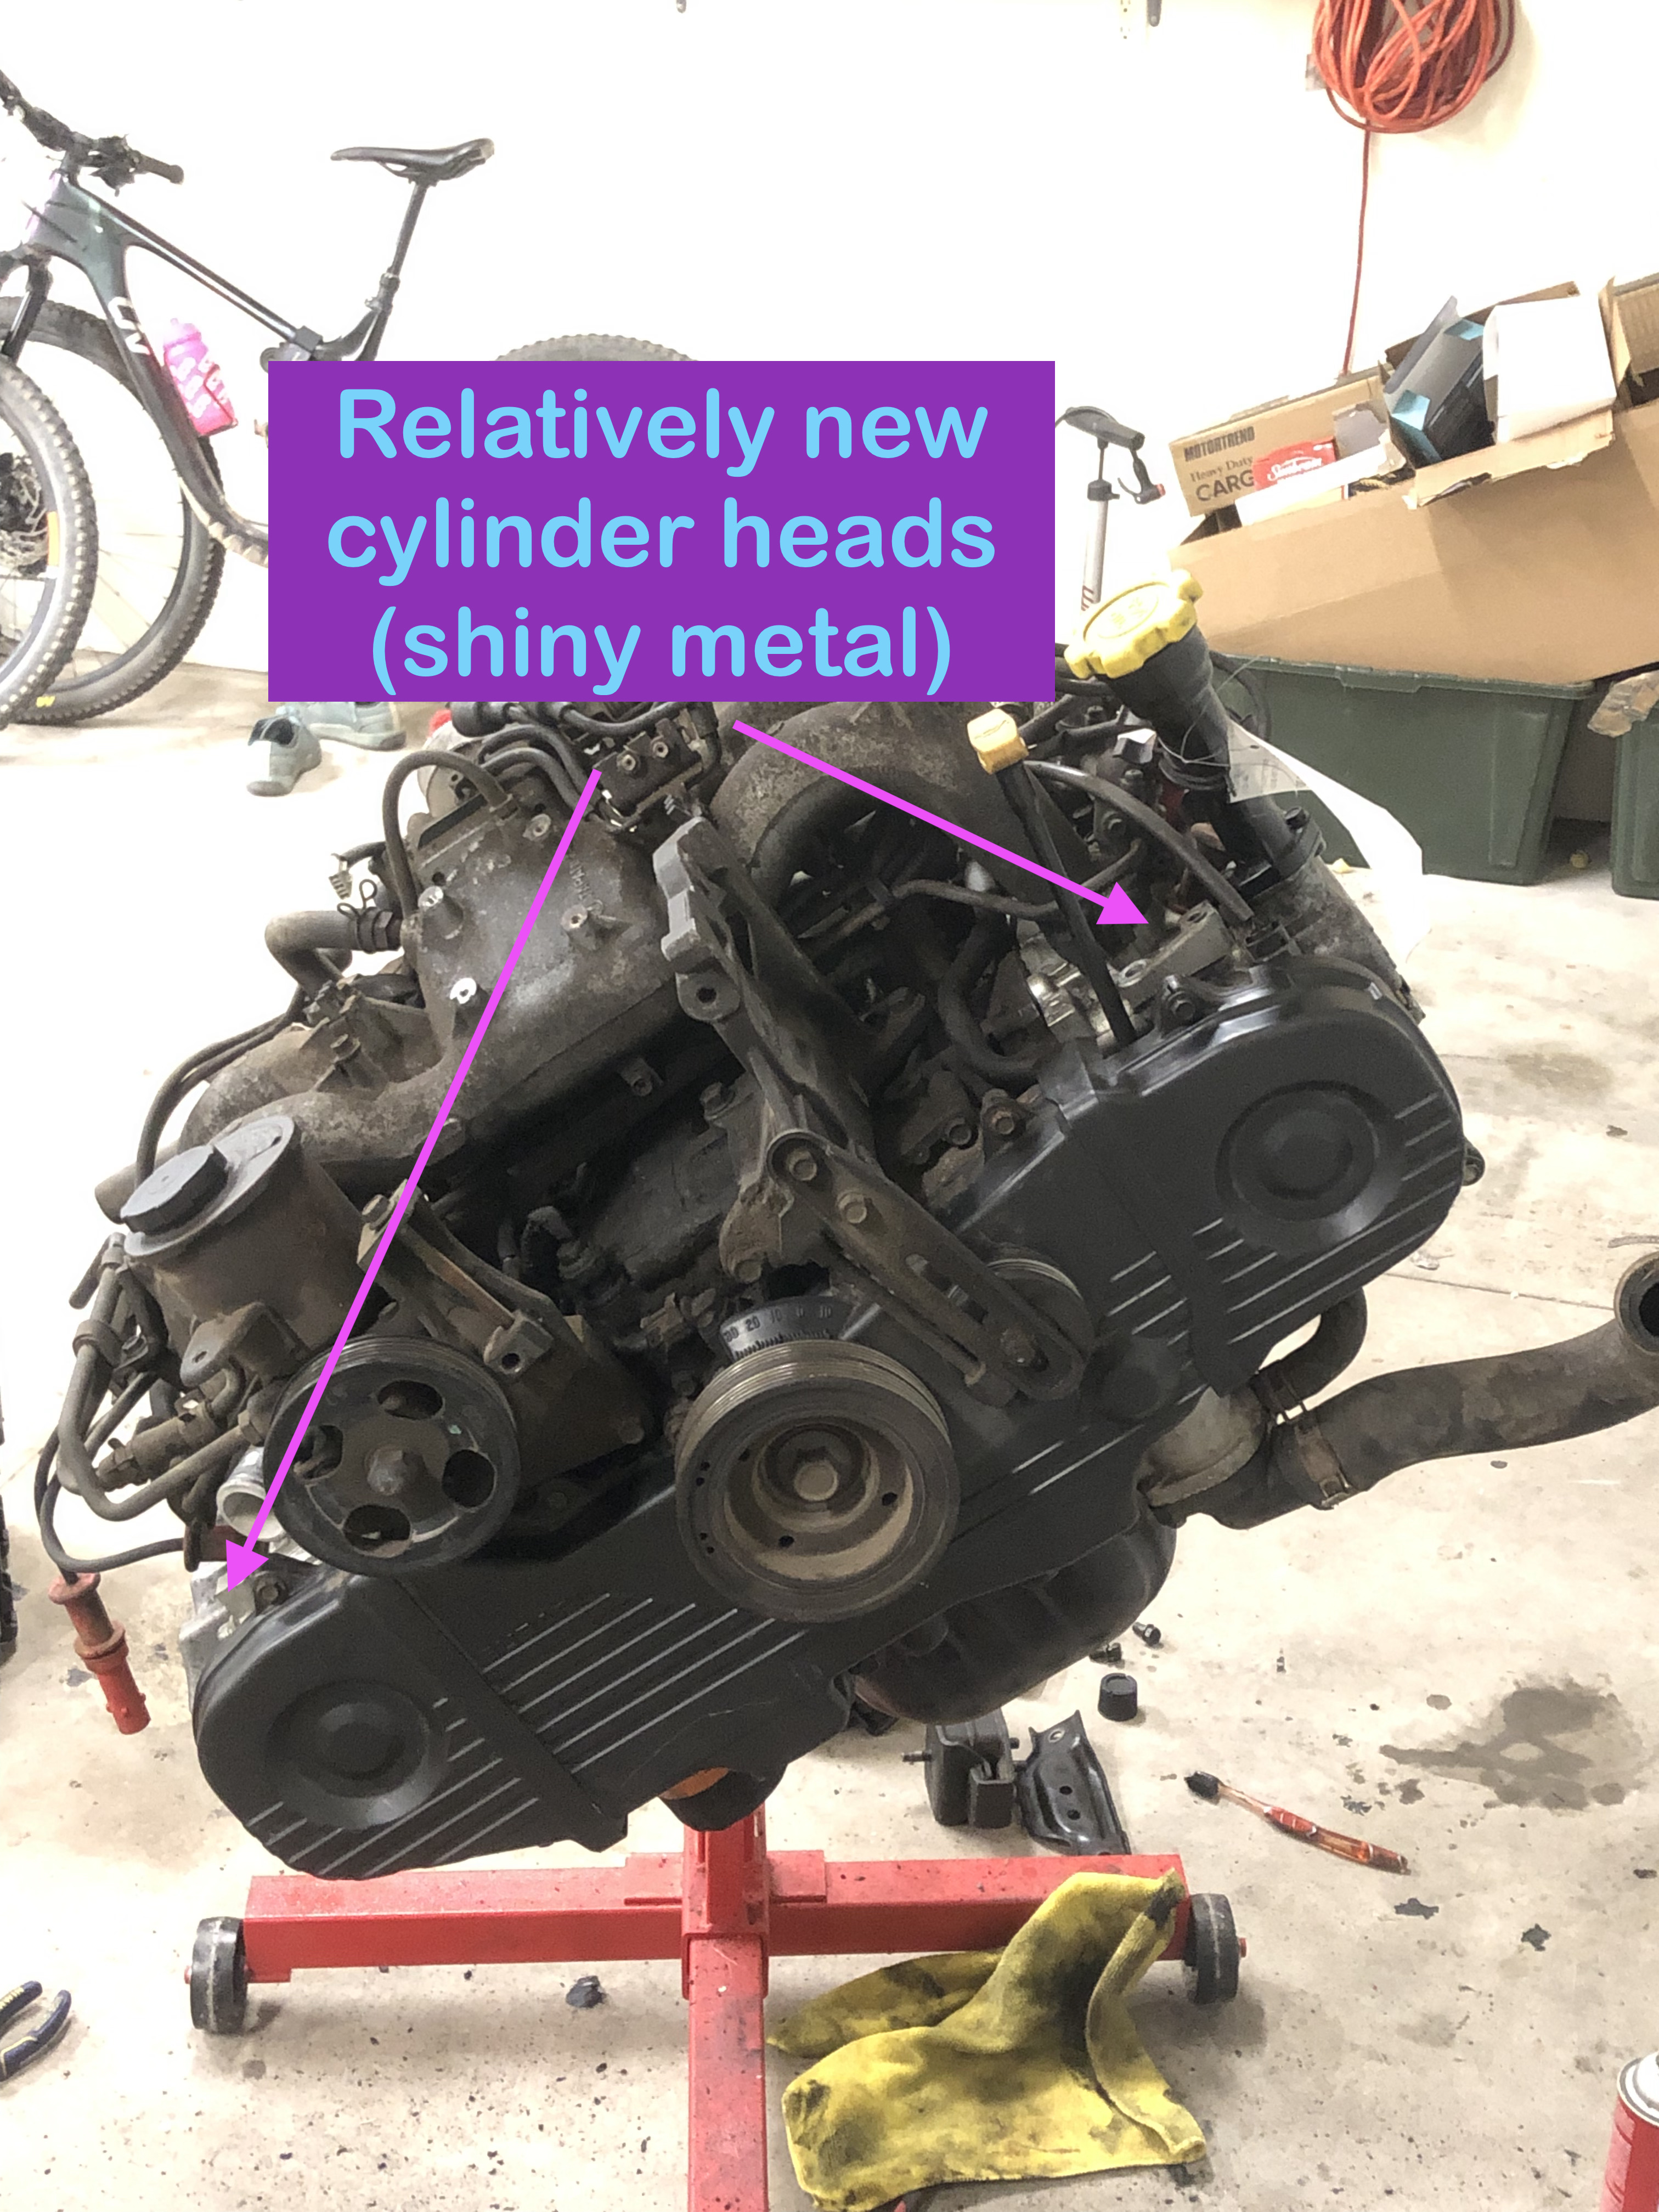
This is the engine that I going back in the car, single overhead cam instead of dual overhead cam.
Tune-up Section
First things first was finding all the tune up parts for this thing: spark plugs, spark plug wires, filters, belts, etc... These parts aren't really that expensive by themselves; once you start purchasing a lot of them that's when it becomes expensive. In addition to general tune up parts I also ended up getting some specialty parts; Most notably a new radiator and an exhaust manifold. Why a radiator you may ask? Well, I messed up the old radiator pretty good getting it out of the car, severely bending some of the cooling fins. Hopefully I can come up with a better mounting solution for the radiator than chicken wire, which is what I purchased the car with. I ended up putting most of the tune up parts on with the engine out of the car for easier access to everything. Once this was done I could actually move onto slapping the engine in the car. I also ended up putting the old EJ25 flex plate on the engine, so there wouldn't be any issues getting the flex plate to torque converter bolts to align. As for the new exhaust manifold, the styling of the exiting port on the cylinder head is completely different. It has two exiting ports rather than just one. It additionally has a different stud configuration from the original. That's the primary reasoning behind the exhaust manifold swap.
Engine in the Car
Getting the engine in the car wasn't as easy as I thought it would be, I had some issues aligning the engine with the transmission mainly due to the fact that I didn't have long enough chains. If I had longer chains then I would have been able to mount the leveler parallel crank pulley to flex plate, rather than parallel passenger to driver valve cover. I had to take off the intake manifold and secure the chains to intake manifold mounting points. There are 8 of these points, they are quite strong, and they are out on the edges of the engine giving you really better control of where you are directing the engine. Initially I used a neandrathal way of hoisting the engine, two attachment points (one on the ac compressor bracket and the other near the bulkhead engine connectors. These points on the engine are strong but they also do not balance the weight that well.
In the end I had to take the engine in and out of the car 4 times. This is just the nature of the game sometimes; Especially considering my current experience level with cars. Sure I've worked on them, but I only just started working on them seriously ~2 years ago. A couple of times the engine was spun in the wrong direction, another the engine mounting studs were not lining up with their slots, and the remaining two times the engine was obnoxiously tipping way too far forward... :| . Eventually though with enough patience I was able to get it to a point where I could thread on two of the four bellhousing bolts. The bolts were only threaded on when the engine and transmission were ~.5 inches away from each other to prevent any unnecessary tangential forces.
Putting the intake manifold back on the car wasn't too terrible. I was mainly just worried about not plugging something in, or failing to reconnect a disconnected vacuum line. Most of this stuff is located underneath the manifold and is quite difficult to access once installed.
Engine Mounts
Here you can use either the EJ25 or EJ22 engine mounts, they are identical to one another. Once the engine was actually in the car, getting the engine mounts in place was a little difficult. I ended up taking them off to get the engine to bolt up with the transmission initially, and then it ended up being extremely difficult to actually get them bolted to the engine. There was just not a whole lot of space to get them on really ~3 inches, and this was quite similar to the actual height of the engine mounts to begin with. If I was to do this again I would definitely leave the engine mounts on, and manipulate the transmission to get the mount studs to line up correctly.
Bellhousing Studs
The bottom two studs were a bear to get in. On the passenger side of the car I was able to modify the stud a little (I just ended up grinding down the stud a little to get it to fit past the axle). This wasn't too bad and ended up working just fine. On the driver's side, though, I ended up removing the inner part of the axle from the transmission, and this gave me plenty of access to get the stud to slide in. This took a long time to accomplish however, just due to the fact that the strut to knuckle bolts were extremely tight/rusty and took me multiple attempts and WD40 spray dows to break loose. Additionally, on the driver's side I managed to get my roll pin punch stuck in the transmission axle spline. It ended up being really difficult to extract, and took me the better part of an hour to get it out. Once this was out though it was easy to get the stud in, and everything put back together.
Radiator Mounting Solution
Ok, so the car did not come with the radiator mounting bracket. All that was holding the radiator in was some chicken wire. I made two brackets one for each side of the radiator. They fit alright, but one side is bent a little more than the other to get the threads to line up correctly. If the radiator doesn't contact the drive belt at all then I'll call that a success. It also took some time to build these as I do not own the most advanced tools. I made sure to paint them for rust prevention. They're definitely not the prettiest and we will see if they hold up or not.
This is one of two parts for radiator mounting that I fabricated. The other side looks very similar.
More General Items
Power steering, alternator, and drive belt were pretty easy to get back on the engine. Main thing was making sure that the belt tightness was set correctly, or within spec. I don't have covers for the drive belt yet but will probably end up getting some just to prevent accidental run-ins with the belt. Additionally, the power steering reservoir was still full with fairly good condition fluid, so I didn't really bother messing with it. And flushing the power steering system can oftentimes be an extremely messy process. Getting the starter in wasn't too bad either. I ended up fabricating a ground point for the starter when I did not ultimately need to (I thought I lost the bracket). And thankfully the transmission had a stud for the starter to mount to on the bottom so I didn't have to tap an additional hole.Another snag I ran into was a broken bolt for the windshield wiper fluid reservior. I initially tried to weld a nut onto the end of it with the flux core. This did not end up working, and all I accomplished was building up an ugly bead of weld on the threads of the nut. I just ended up dremeling the end of the fastener flush to the body of the car and drilled and tapped the hole for a larger fastener size. This was high up on the list of things to do as no windshield wiper fluid in the Colorado winters can spell trouble. :)
Vacuum lines were kind of an issue for me as well. I couldn't really find a whole lot on the internet about the routing of them in the engine bay. There were some lines left on the engine that had been cut, and the previous owner had taken the top end of the engine bay apart before I received the car. I did my best to route them, but there were one or two that I just ended up plugging with a bolt.
Another big item was checking the condition of the fuel in the tank. The car had been parked for a year and a half with a quarter tank of fuel. Unfortunately, I did not remove the fuel pump first to take a look in the tank. And I was thinking that the fuel was going to be bad regardless. So I ended up dropping the exhaust, some of the heat shielding, and protective plates beforehand. The fuel in the tank did not look bad, and there was no rust or really any particles to be seen (other than the dust that I knocked in taking the pump out). There is a massive skid plate covering the rear differential which would have had to been removed for me to remove the driveshaft. This skid plate is connected to the rear subframe through bushings, these bolts would have been pretty difficult to remove so I'm glad I did not have to go that route. After the car was running and driving John and I took the car to the fuel station and put some 91 in there to hopefully bring the octane level up a little. The condition of the fuel at first sure wasn't helping the engine complete the combustion cycle very well.
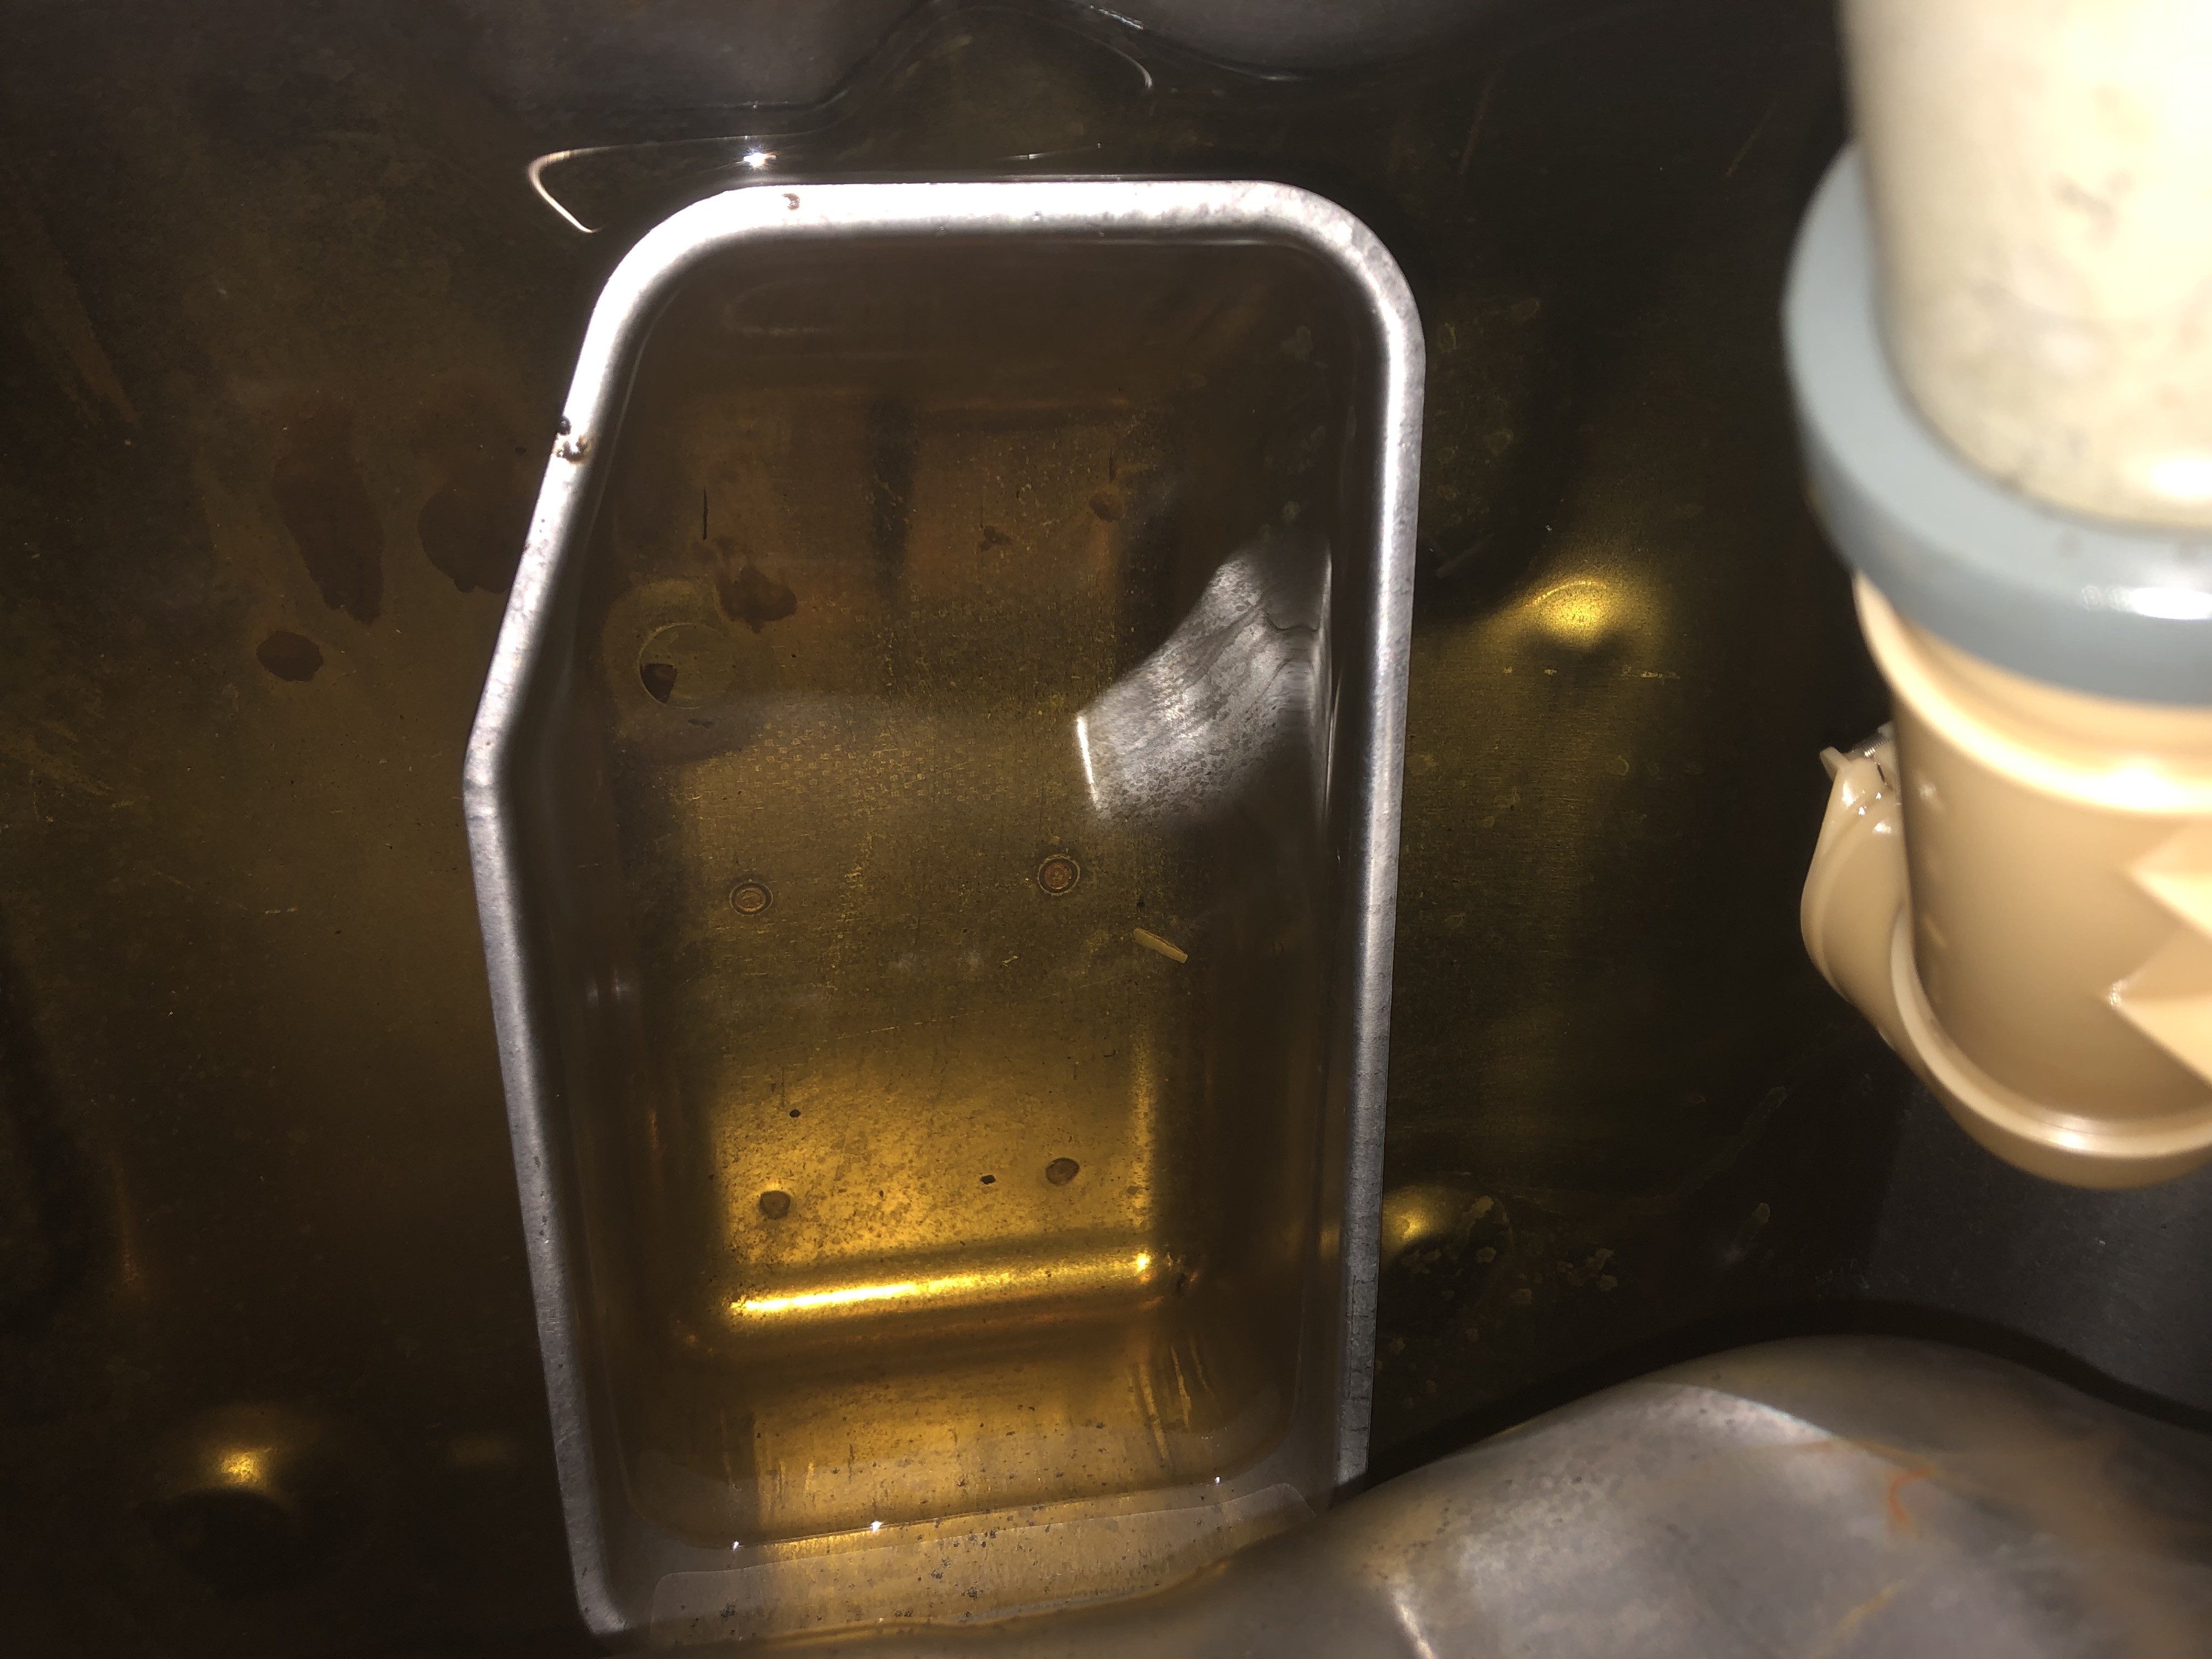
Tank is very clean, the little bit of dirt in the tank is from me removing fuel pump (pump had a lot of dirt on top of it)
There were a couple more simple things that were addressed like oxygen sensors, plugging in sensors, and getting the intake system integrated. Also fluids like new engine oil, automatic transmission fluid, and coolant were either changed or topped off to give the car the best chance for successful startup. Here is a video of the initial start-up. There was some residual oil in the exhaust manifold, which was burned off pretty quickly in that short period.
Further Upgrades
Looking ahead to future modifications and upgrades. I definitely want to get this thing on a bit of a lift with some larger all-terrain tires, probably Falken Wildpeaks. Additionally, I want to add a center diff lock switch for the transmission, which should help a bunch getting out of tricky spots. This is a pretty easy modification to add, requiring a little wiring and placement of switch. I want to mount some offroad lights probably near the A pillars on the car. And then from there it's really onto custom protection for the fuel tank, oil pan, body with skid plates.
Thank you so much for reading, and click here for some other articles too! Until next time - Andrew
X